Search This Blog

Tuesday, 27 February 2018

Testing the arduino board working or not | Basics of IdE program :- uploading the program to arduino


The programming in arduino IDE mainly requires some basics of c programming skills.

The arduino program classified into two parts 
1. Void setup
2. Void loop


The void setup runs the code only once while void setup run repeatedly until arduino board is switched off. The led blink is the first program to run to test whether the arduino board is working or not. The arduino is tested working or not simply by uploading the LED sketch.
In void setup loop the pin is configured once as output or low using pinMode keyword and digitalWrite and digitalRead keyword while write is used to switch high or low the pin and read is used to read the information from the sensors associated with the pin.


In above picture has the LED sketch the marked are the instruction. The pinMode is used to configure the LED_BUILTIN that in turns pin 13 as OUTPUT. The digitalWrite makes the LED_BUILTIN as HIGH(on) by making DELAY keyword for 1000 m second and LOW(off) by making DELAY for 1000m second run continuously.


The information written between the *\ and /* are the comments which tells what the program is about. A new user cannot understand if the program is very complex therefore the comments is necessary.


The information preceding with // is also an comment which tells the what the single  instruction line is about.

The compiler do not read the comments during the execution of program only the main instruction (marked in 1st picture) are executed in line by line .

NOTE: 1.  The arduino program is case sensitive.
EX: The pinMode keyword , here "M " must be capital if small m is used the error is showed in blank screen.


don't forget to view the video about more information about arduino programming:


FOLLOW THE PAGE FOR MORE UPDATES.

Monday, 19 February 2018

configuring the drivers: Arduino

A new arduino to connect pc, the configuration of the port to  is required to communicate between them this can be done by connecting the arduino to the pc usb port and the further process is shown in video below.


Wednesday, 14 February 2018

Arduino for begginers #2 Arduino uno.

Arduino uno?


The arduino uno is programmable device consists of Atmel ATmega328 microcontroller with operating voltage 5v ,flash memory 32kb of which 0.5kb used by bootloader, sram 2kb and clock speed of 16Mhz.

     click shop now to buy from amazon.


An video about the arduino uno explaining about the port configuration and basics.


The above picture consists of series of pin in upward and downward are the input/output pin are classified into 4 types:-

1) 14 Digital pins i/o  0-13(upwards)

These pins can either inputs or outputs. Inputs are used to read the information from sensors while output are used to control the actuators. We have to specify the direction(input/output) in sketch IDE . Digital input can read one of two values and digital outputs can only output one two values(HIGH/LOW)

2)6 analog input pin 0-5(downwards)

The analog input pins are used to reading voltage measurement from analog sensors. analog inputs can measure 1024 different level of voltages, while digital inputs can distinguish b/w only two different levels.

3)6 analog output pin (3,5,6,9,10 and 11)

These pins are also called as PWM and these can act as digital pin and analog output, these should be specified during sketch.

4)power(downwards)

power ports provides 5v output,reset,ground and vin.


The board has powered from the computer usb port or an AC adapter(9v).

Monday, 12 February 2018

beginners guide - getting started with arduino.

what is arduino?

The arduino board is small microcontroller board,which is small circuit that contains a whole computer on a small chip that is microcontroller. Arduino is one of the platform which provide the microcontroller to put sketch on it.


Arduino is composed of two parts:-

1.Arduino board (hardware)
2.Arduino integrated development environment(software)


Arduino board:-

Arduino is piece of hardware we work on it.
click here to buy from amazon.

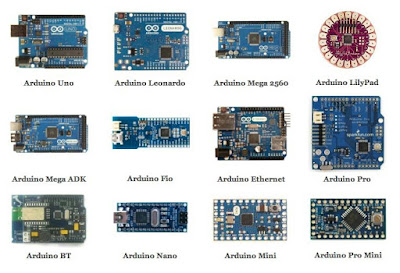
The above picture shows the different types of arduino boards which has different memory capacity and used depending upon the required application. The arduino has row of pins as we can see in picture which is used as input and output pins. These pins are used to connect sensors and actuators. A sensors senses something in physical environment and converts it to a signal a computer can understand which again converted into human understandable form, while actuators converts signal from computer into an act in physical world.


Arduino integrated development environment:-


The IDE is a software we can run on computer. The IDE is is used create a sketch and then uploaded to the arduino board. The sketch instructs the board what to do.


The above picture has written with little sketch which turns on a LED on for one second and then off for one second. working on hardware meant building circuits using hundred of transistor, resistors, capacitors, inductors and so on. Thus making changes required to cut the wire and very difficult disconnect once solder is made between the components, While software is easier to modify than hardware with a few keypress we can change the logic of the device.